原文:MVVM architecture, ViewModel and LiveData (Part 2)
在Google I / O期间,Google推出了包含LiveData 和ViewModel 的architecture components ,这有助于使用MVVM模式开发Android应用程序。 本文讨论这些组件如何为遵循MVVM的Android应用程序提供服务。
在本系列的第一篇文章中,我们讨论了这些组件如何为遵循MVVM的Android应用程序提供服务。 在第二篇文章中,我们将回答在依赖注入的第一篇文章结尾处提出的其中一个问题。
本文假定您具有Dagger的基本知识,因为我们将专注于在MVVM示例中设置最新的Dagger版本(版本2.11)以实现依赖注入。
如果您需要关于Dagger 2.11的基本信息,请查看Dagger用户指南。
配置Dagger 2.11 首先,让我们将Dagger 2.11依赖添加到我们的MVVM Sample。
指定Dagger版本2.11 1 2 3 4 project .ext { dagger_version = "2.11" }
1 2 annotationProcessor "com.google.dagger:dagger-compiler:$dagger_version" compile "com.google.dagger:dagger:$project.dagger_version"
1 2 3 compile "com.google.dagger:dagger-android:$project.dagger_version" compile "com.google.dagger:dagger-android-support:$project.dagger_version" annotationProcessor "com.google.dagger:dagger-android-processor:$dagger_version"
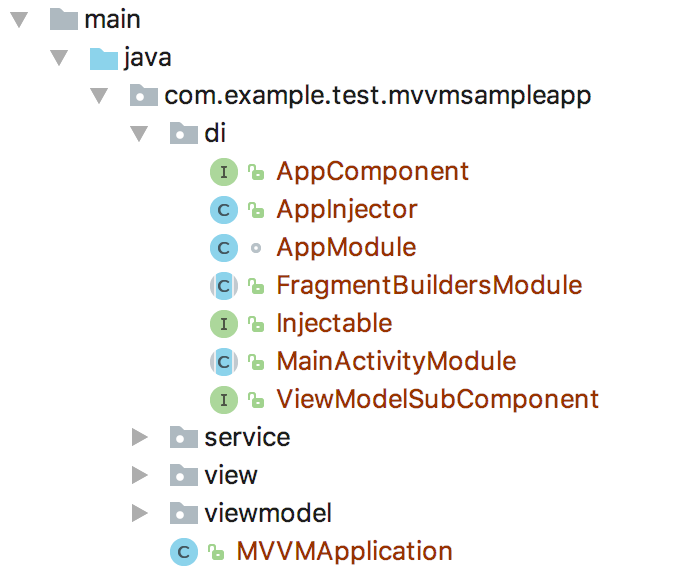
Dagger 2.11项目设置 下图显示了本示例中的主Dagger 2.11设置。
我们主要有以下Dagger App类/接口:
AppModule 是一个Dagger模块,负责在应用程序级别提供单例服务,例如GitHubService 和ProjectViewModelFactory 。AppComponent 负责注入AppModule 。ViewModelSubComponent 是创建View Model实例的子组件。MainActivityModule 和FragmentBuildersModule 是Activity和Fragment实例提供程序。Injectable 只是可注射Fragment的标记接口。AppInjector 是一个辅助类,用于在实现Injectable 接口时自动注入Fragments。
现在,让我们进入这个设置中每个Dagger项目的细节。
创建 View Model SubComponent 以下代码片断显示了ViewModelSubComponent 接口,该接口负责创建ViewModel实例:
1 2 3 4 5 6 7 8 9 10 @Subcomponent public interface ViewModelSubComponent { @Subcomponent .Builder interface Builder { ViewModelSubComponent build () ; } ProjectListViewModel projectListViewModel () ; ProjectViewModel projectViewModel () ; }
请注意,ViewModelSubComponent 将被ProjectViewModelFactory 调用以获取ViewModel实例。
但什么是_ProjectViewModelFactory_?
下一节回答这个问题。
创建自定义View Model Factory ProjectViewModelFactory 是一个扩展ViewModelProvider.Factory 以便将ViewModel实例提供给使用者Fragment类的工厂。
以下代码片段显示了ProjectViewModelFactory ,它是一个扩展ViewModelProvider.Factory 的自解释Factory实现:
1 2 3 4 5 6 7 8 9 10 11 12 13 14 15 16 17 18 19 20 21 22 23 24 25 26 27 28 29 30 31 32 33 34 35 @Singleton public class ProjectViewModelFactory implements ViewModelProvider .Factory { private final ArrayMap<Class, Callable<? extends ViewModel >> creators; @Inject public ProjectViewModelFactory (ViewModelSubComponent viewModelSubComponent) { creators = new ArrayMap <>(); creators.put(ProjectViewModel.class, () -> viewModelSubComponent.projectViewModel()); creators.put(ProjectListViewModel.class, () -> viewModelSubComponent.projectListViewModel()); } @Override public <T extends ViewModel > T create (Class<T> modelClass) { Callable<? extends ViewModel > creator = creators.get(modelClass); if (creator == null ) { for (Map.Entry<Class, Callable<? extends ViewModel >> entry : creators.entrySet()) { if (modelClass.isAssignableFrom(entry.getKey())) { creator = entry.getValue(); break ; } } } if (creator == null ) { throw new IllegalArgumentException ("Unknown model class " + modelClass); } try { return (T) creator.call(); } catch (Exception e) { throw new RuntimeException (e); } } }
现在,让我们看下一节中的主要应用程序模块。
创建App模块 AppModule 是一个Dagger模块,负责在应用程序级别为消费者提供单例服务,例如GitHubService 和ProjectViewModelFactory 。 以下代码片段显示了AppModule 类:
1 2 3 4 5 6 7 8 9 10 11 12 13 14 15 16 17 18 @Module(subcomponents = ViewModelSubComponent.class) class AppModule { @Singleton @Provides GitHubService provideGithubService () { return new Retrofit .Builder() .baseUrl(GitHubService.HTTPS_API_GITHUB_URL) .addConverterFactory(GsonConverterFactory.create()) .build() .create(GitHubService.class); } @Singleton @Provides ViewModelProvider.Factory provideViewModelFactory ( ViewModelSubComponent.Builder viewModelSubComponent) { return new ProjectViewModelFactory (viewModelSubComponent.build()); } }
这里需要注意的一点是,不要忘记通过在**@Module注解的 subcomponents参数中指定 ViewModelSubComponent到 AppModule**。
创建 Injectable和 AppInjector 可注入接口只是一个普通的空白标记接口,如下所示:
1 2 public interface Injectable {}
Injectable 将由可注射的Fragment实施。
为了在实现Injectable 接口时自动注入片段,将创建以下AppInjector 助手类,以在**onFragmentCreated()**上注入片段实例,如下所示:
1 2 3 4 5 6 7 8 9 10 11 12 13 14 15 16 17 18 19 20 21 22 23 24 25 26 27 28 29 30 31 32 33 34 35 36 public class AppInjector { private AppInjector () {} public static void init (MVVMApplication mvvmApplication) { DaggerAppComponent.builder().application(mvvmApplication) .build().inject(mvvmApplication); mvvmApplication .registerActivityLifecycleCallbacks(new Application .ActivityLifecycleCallbacks() { @Override public void onActivityCreated (Activity activity, Bundle savedInstanceState) { handleActivity(activity); } }); } private static void handleActivity (Activity activity) { if (activity instanceof HasSupportFragmentInjector) { AndroidInjection.inject(activity); } if (activity instanceof FragmentActivity) { ((FragmentActivity) activity).getSupportFragmentManager() .registerFragmentLifecycleCallbacks( new FragmentManager .FragmentLifecycleCallbacks() { @Override public void onFragmentCreated (FragmentManager fm, Fragment fragment, Bundle savedInstanceState) { if (fragment instanceof Injectable) { AndroidSupportInjection.inject(fragment); } } }, true ); } } }
有一点需要注意,**AppInjector.init()**将在应用程序启动时调用(正如我们将在自定义应用程序类部分中展示的那样)。
创建 Activity 和 Fragment Modules 以下代码片段显示了Fragments Dagger模块:
1 2 3 4 5 6 7 8 @Module public abstract class FragmentBuildersModule { @ContributesAndroidInjector abstract ProjectFragment contributeProjectFragment () ; @ContributesAndroidInjector abstract ProjectListFragment contributeProjectListFragment () ; }
从Dagger 2.10开始,@ContributesAndroidInjector 轻松将活动和片段附加到匕首图上。 以下代码片断显示了MainActivityModule :
1 2 3 4 5 @Module public abstract class MainActivityModule { @ContributesAndroidInjector(modules = FragmentBuildersModule.class) abstract MainActivity contributeMainActivity () ; }
现在,我们来看看Dagger 2.11设置中的最后一项,即AppComponent 。
创建AppComponent 下一个代码片段显示了AppComponent 接口。
1 2 3 4 5 6 7 8 9 10 11 12 13 14 @Singleton @Component(modules = { AndroidInjectionModule.class, AppModule.class, MainActivityModule.class}) public interface AppComponent { @Component .Builder interface Builder { @BindsInstance Builder application (Application application) ; AppComponent build () ; } void inject (MVVMApplication mvvmApplication) ; }
有一件重要的事情要注意,除了包括AppModule 和MainActivityModule 之外,我们还根据官方文档向AppComponent 添加了AndroidSupportInjectionModule ,该文档声明有必要确保所有必要的绑定都可用。 AndroidSupportInjectionModule 是dagger-android中的一个内置模块:
https://github.com/google/dagger/blob/master/java/dagger/android/support/AndroidSupportInjectionModule.java
更新存储库层实现 现在,我们完成了设置Dagger 2.11,让我们更新我们现有的应用程序代码,以便利用Dagger依赖注入。
ProjectRepository 不再需要手动创建GitHubService 服务实例,它所需要做的就是在它的GitHubService 实例的构造函数中使用**@Inject**,如下所示:
1 2 3 4 5 6 7 8 9 10 11 @Singleton public class ProjectRepository { private GitHubService gitHubService; @Inject public ProjectRepository (GitHubService gitHubService) { this .gitHubService = gitHubService; } }
更新ViewModel层实现 更新ViewModel图层也是必要的,以避免在此图层内手动从ProjectRepository 创建实例。
以下代码片段显示了ProjectViewModel 的一个示例,该示例使用@inject注释来注入Application 和ProjectRepository 实例:
1 2 3 4 5 6 7 8 9 10 11 12 13 14 15 16 17 18 19 20 21 22 23 24 25 26 27 28 29 30 public class ProjectViewModel extends AndroidViewModel { private static final String TAG = ProjectViewModel.class.getName(); private static final MutableLiveData ABSENT = new MutableLiveData (); { ABSENT.setValue(null ); } private final LiveData<Project> projectObservable; private final MutableLiveData<String> projectID; public ObservableField<Project> project = new ObservableField <>(); @Inject public ProjectViewModel (@NonNull ProjectRepository projectRepository, @NonNull Application application) { super (application); this .projectID = new MutableLiveData <>(); projectObservable = Transformations.switchMap(projectID, input -> { if (input.isEmpty()) { return ABSENT; } return projectRepository.getProjectDetails("Google" , projectID.getValue()); }); } }
更新视图实现(Fragments和主要的Activity) 更新视图层也是必要的,以避免在该图层内手动创建ViewModel类的实例。
以下代码片段显示了ProjectFragment 的一个示例:
1 2 3 4 5 6 7 8 9 10 11 12 13 14 15 public class ProjectFragment extends LifecycleFragment implements Injectable { @Inject ViewModelProvider.Factory viewModelFactory; @Override public void onActivityCreated (@Nullable Bundle savedInstanceState) { super .onActivityCreated(savedInstanceState); final ProjectViewModel viewModel = ViewModelProviders.of(this , viewModelFactory) .get(ProjectViewModel.class); } }
这里需要注意的一些重点:
现在每个Fragment都必须实现可注入接口。
Fragment应该引用ViewModelProvider.Factory 以获取ViewModel实例。
创建定制 Application类 最后,我们的自定义application类代码如下所示:
1 2 3 4 5 6 7 8 9 10 11 12 13 14 15 public class MVVMApplication extends Application implements HasActivityInjector { @Inject DispatchingAndroidInjector<Activity> dispatchingAndroidInjector; @Override public void onCreate () { super .onCreate(); AppInjector.init(this ); } @Override public DispatchingAndroidInjector<Activity> activityInjector () { return dispatchingAndroidInjector; } }
这里需要注意两点:
Application必须实现HasActivityInjector ,并**@Inject DispatchingAndroidInjector** 才能从**activityInjector()**方法返回。
在Application类的onCreate()中,我们初始化 AppInjector 以便在实现Injectable 接口时自动注入Fragments。
源代码 在GitHub中检查更新的应用程序的源代码,随意随意分叉和更新,如你所愿:
https://github.com/hazems/mvvm-sample-app/tree/part2
下一步是什么 在本文后,您现在有足够的信息来使用Google Architectural components创建自己的MVVM应用程序。 希望我能为本系列的下一篇文章留有余地,内容包括以下主题:
错误处理。
在此演示中添加更多功能,以了解Room如何促进SQLite数据操作,以及如何实现有效的缓存。
单元测试。
我们在哪里可以将Rx用于此架构?
我们如何使用Kotlin简化这个实现? (旅程真的有很多有趣的东西 : ))。
如果你喜欢这篇文章,我感谢你的支持与他人分享这篇文章,让伟大的Android社区知道。